启动一个标准的 Vault 服务
如果读者还记得我们之前使用 dev 模式启动的过程时会发现,dev 模式启动后是直接输出了 Root 令牌,并且直接可以登录的:
$ vault server -dev
==> Vault server configuration:

             Api Address: http://127.0.0.1:8200
                     Cgo: disabled
         Cluster Address: https://127.0.0.1:8201
              Go Version: go1.17.5
              Listener 1: tcp (addr: "127.0.0.1:8200", cluster address: "127.0.0.1:8201", max_request_duration: "1m30s", max_request_size: "33554432", tls: "disabled")
               Log Level: info
                   Mlock: supported: false, enabled: false
           Recovery Mode: false
                 Storage: inmem
                 Version: Vault v1.9.2
             Version Sha: f4c6d873e2767c0d6853b5d9ffc77b0d297bfbdf+CHANGES

==> Vault server started! Log data will stream in below:

...

WARNING! dev mode is enabled! In this mode, Vault runs entirely in-memory
and starts unsealed with a single unseal key. The root token is already
authenticated to the CLI, so you can immediately begin using Vault.

You may need to set the following environment variable:

    $ export VAULT_ADDR='http://127.0.0.1:8200'

The unseal key and root token are displayed below in case you want to
seal/unseal the Vault or re-authenticate.

Unseal Key: Rfmlaa+GXHAyGMHjtxPgfd6ZVSY01zA4MVdRfnYpxkA=
Root Token: s.j9YXmamyMC1xnD13iCooz0W3

Development mode should NOT be used in production installations!
然而这只能是用作演示,不可用于生产环境,比如在 dev 模式下,我们写入 Vault 的所有信息实际上都是保存在内存中的,服务一旦重启数据就将全部丢失。
一个生产环境推荐的 Vault 架构如下:
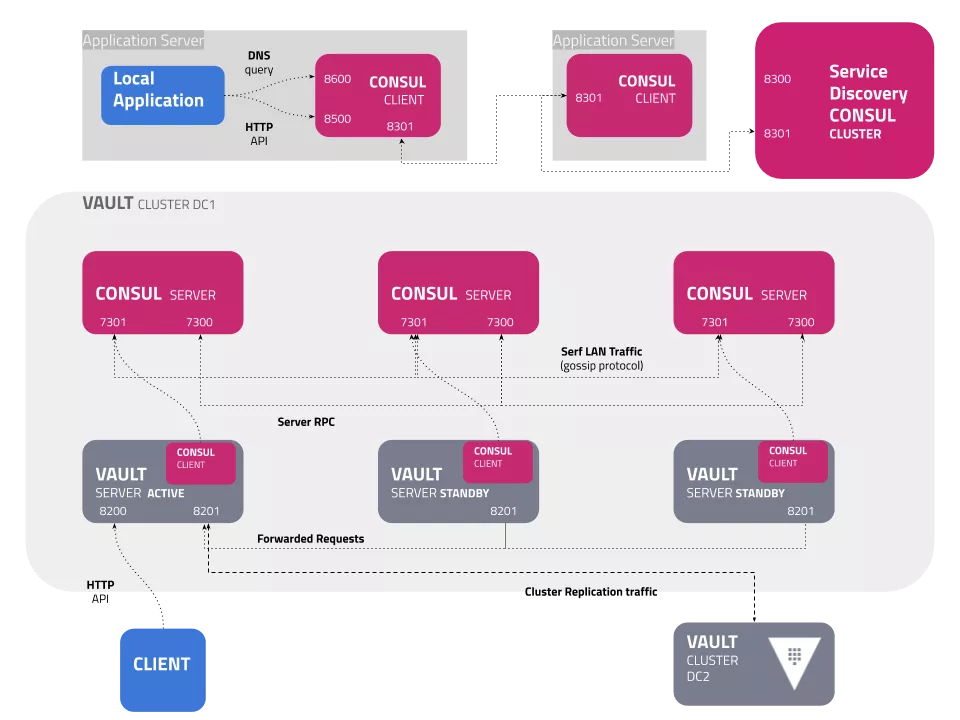
HashiCorp 推荐使用 Consul 作为 Vault 的数据存储 Backend(推荐但并不强制,Vault 支持丰富的数据存储 Backend)。在一个生产环境中,我们将会部署一个 Consul 集群,但是在本书中为了演示方便,我们将使用 dev 模式启动 Consul:
$ consul agent -dev
然后我们要准备一个 Vault 的配置文件,我们就起名叫 config.hcl 吧:
storage "consul"{
  address = "127.0.0.1:8500"
  path    = "vault/"
}

listener "tcp"{
  address     = "127.0.0.1:8200"
  tls_disable = 1
}
我们在 storage 配置节中声明使用本机启动的 Consul 作为 Backend 存储,路径在 vault/ 下(这是 Consul KV 存储的路径),并且在本机 8200 端口提供服务。由于是演示使用,我们没有为 Vault 准备证书,所以我们通过 tls_disable = 1 禁用了 tls。
准备好了配置文件后,我们启动 Vault:
$ vault server -config=config.hcl
WARNING! mlock is not supported on this system! An mlockall(2)-like syscall to
prevent memory from being swapped to disk is not supported on this system. For
better security, only run Vault on systems where this call is supported. If
you are running Vault in a Docker container, provide the IPC_LOCK cap to the
container.
==> Vault server configuration:

             Api Address: http://127.0.0.1:8200
                     Cgo: disabled
         Cluster Address: https://127.0.0.1:8201
              Go Version: go1.17.5
              Listener 1: tcp (addr: "127.0.0.1:8200", cluster address: "127.0.0.1:8201", max_request_duration: "1m30s", max_request_size: "33554432", tls: "disabled")
               Log Level: info
                   Mlock: supported: false, enabled: false
           Recovery Mode: false
                 Storage: consul (HA available)
                 Version: Vault v1.9.2
             Version Sha: f4c6d873e2767c0d6853b5d9ffc77b0d297bfbdf+CHANGES

==> Vault server started! Log data will stream in below:
值得注意的是我们看到了一个 WARNING 信息,提示我们当前操作系统不支持 mlock。
mlock 是操作系统提供的一个系统调用,它的作用是防止操作系统把进程的内存换出到磁盘上的虚拟内存中。由于 Vault 中保存的是企业最关键的机密信息,如果内存中的明文数据被写入磁盘,就存在泄密的可能,所以生产环境必须启用 mlock。笔者测试的环境使用的是 mac,作为演示笔者不再折腾 mlock。
细心的读者会发现,与使用 dev 模式相比,使用配置文件走正常流程启动 Vault 后我们没有看到 Root 令牌,这是怎么一回事呢?
我们知道生产环境下 Vault 中的机密数据是保存在 Backend 中的,那如果 Backend 中的数据被未授权的人获取了怎么办?比如有内鬼把硬盘做了快照,然后偷偷在其他地方复原了?
Vault 保存在 Backend 中的数据都是加密的。那么第二个问题就是,密钥存在哪里?如果密钥本身也是存在 Backend 中的,那么攻击者复制了硬盘以后,也会得到这个密钥,还是会造成泄密。
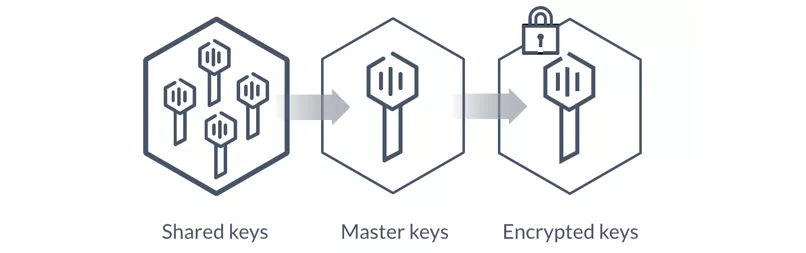
Vault 将这个密钥称为 Master Key 主密钥,Vault 默认使用 Shamir 算法,把主密钥切分成 M 份,管理员必须至少提供其中的 N 份才能还原出主密钥(这里的 M 和 N 都是可配置的,M>=N)理想状态下,我们必须把这 M 份密钥分配给公司内 M 个不同的人,只有在获取其中 N 个人的授权后,Vault 才可以成功解密主密钥,开始工作。Vault 刚启动时由于无法解密主密钥,所以处于 Seal 封印状态,这时 Vault 是无法进行任何操作的。解密主密钥的过程称为 Unseal 解封。
dev 模式启动的 Vault 实际上帮助我们自动地把创建主密钥、解封的步骤都完成了,所以我们启动后可以立即得到 Root 令牌。生产模式部署的 Vault 在启动后,我们还需要一系列的后续动作:
$ vault operator init

Unseal Key 1: 4g8FTfPiyE5f/6vzURVm+ljTEfOCRQPXSZp1WteK1rJu
Unseal Key 2: si53pSe8AulsCZelBPFypf1dyuNeLgUVGKdVfbNWc3+3
Unseal Key 3: qhONs6vqG7eO7DeRgatuCbVPMZ2X06g/U6gnWVliO+de
Unseal Key 4: H8GNnfQdkeACSuHo4dyj+yNrRTs/UEVZbYWHNn6drRR3
Unseal Key 5: uSIbqitWpwcfzP4Tg3y4GJO7NIxRQ+qiy0ZbJBvmHSpY

Initial Root Token: s.n3YQoQMDILejIuWPcQBIGW3Q

Vault initialized with 5 key shares and a key threshold of 3. Please securely
distribute the key shares printed above. When the Vault is re-sealed,
restarted, or stopped, you must supply at least 3 of these keys to unseal it
before it can start servicing requests.

Vault does not store the generated master key. Without at least 3 keys to
reconstruct the master key, Vault will remain permanently sealed!

It is possible to generate new unseal keys, provided you have a quorum of
existing unseal keys shares. See "vault operator rekey" for more information.
在这里我们先执行了 vault operator init 命令,它创建了 Master Key 和 Root 令牌,并且返回了 5 条 Unseal Key。从后续输出中我们可以得知,我们至少需要提供 3 条 Unseal Key 才能成功解封。执行 init 操作的管理员这时应立即把 Unseal Key 用安全的方式传递给 5 个不同的人,并且确保他们彼此不知道其他人的 Key。除了这 5 个人以外,不应该以任何方式在任何地方保存这些 Unseal Key,Vault 也不会以任何形式保存这些 Key。这 5 个人应挑选公司中拥有很高地位,工作岗位稳定的人员,比如 CEO/CTO/董事长等(个人建议)
让我们看一下当前 Vault 的状态:
$ vault status
Key                Value
---                -----
Seal Type          shamir
Initialized        true
Sealed             true
Total Shares       5
Threshold          3
Unseal Progress    0/3
Unseal Nonce       n/a
Version            1.9.2
Storage Type       consul
HA Enabled         true
vault status 命令的输出告诉我们,当前 Vault 已成功初始化,但处于 Seal 状态。Seal 用的是 Shamir 算法,需要提供 5 条中的 3 条 Unseal Key 才能解封,当前已经输入了 0 条 Unseal Key。
需要指出的是,由于在提供 3 条 Unseal Key 之前,Vault 自身也是无法知道已经接收到的 Unseal Key 是否正确的,所以这里的 Unseal Progress 只代表已经接受了多少条 Unseal Key,不代表它们都是正确的。
在封印状态下如果我们尝试使用 Root 令牌登陆会怎么样:
$ vault login s.n3YQoQMDILejIuWPcQBIGW3Q
Error authenticating: error looking up token: Error making API request.

URL: GET http://localhost:8200/v1/auth/token/lookup-self
Code: 503. Errors:

* Vault is sealed
Vault 拒绝了我们的操作,告诉我们,Vault 当前正处于封印状态。
让我们输入一条 Unseal Key:
$ vault operator unseal 4g8FTfPiyE5f/6vzURVm+ljTEfOCRQPXSZp1WteK1rJu
Key                Value
---                -----
Seal Type          shamir
Initialized        true
Sealed             true
Total Shares       5
Threshold          3
Unseal Progress    1/3
Unseal Nonce       f0cd0a86-16e3-d097-c4bc-bb4692ae16be
Version            1.9.2
Storage Type       consul
HA Enabled         true
我们可以看到,Unseal Progress 变成了 1/3,Sealed 状态仍然为 true。让我们输入剩下的两条:
$ vault operator unseal si53pSe8AulsCZelBPFypf1dyuNeLgUVGKdVfbNWc3+3
Key                Value
---                -----
Seal Type          shamir
Initialized        true
Sealed             true
Total Shares       5
Threshold          3
Unseal Progress    2/3
Unseal Nonce       f0cd0a86-16e3-d097-c4bc-bb4692ae16be
Version            1.9.2
Storage Type       consul
HA Enabled         true

$ vault operator unseal qhONs6vqG7eO7DeRgatuCbVPMZ2X06g/U6gnWVliO+de
Key                    Value
---                    -----
Seal Type              shamir
Initialized            true
Sealed                 false
Total Shares           5
Threshold              3
Version                1.9.2
Storage Type           consul
Cluster Name           vault-cluster-cf228f17
Cluster ID             f715d277-6934-1bf4-70fe-b04e16fdf2e5
HA Enabled             true
HA Cluster             n/a
HA Mode                standby
Active Node Address    <none>
可以看到,输入第二条时 Vault 仍然处于封印状态,而输入第三条后,Sealed 变成了 fasle,Vault 成功解封。这五条 Unseal Key 可以任选三条,可以以任意顺序输入,单条 Unseal Key 重复输入是无效的。让我们重新尝试登陆:
$ vault login s.n3YQoQMDILejIuWPcQBIGW3Q
Success! You are now authenticated. The token information displayed below
is already stored in the token helper. You do NOT need to run "vault login"
again. Future Vault requests will automatically use this token.

Key                  Value
---                  -----
token                s.n3YQoQMDILejIuWPcQBIGW3Q
token_accessor       3IVU2OOmeJ6uPpwWIxENzML8
token_duration       ∞
token_renewable      false
token_policies       ["root"]
identity_policies    []
policies             ["root"]
这次就成功了,Vault 解封后就可以正常操作了。
可以看到的是,在 Vault 的工作中,Master Key 处于一个至关重要的位置,它太过重要以至于必须严加保管。所以执行 init 后输出 Unseal Key 的那个瞬间,应该在它们的生命周期中仅有的一次聚首,从此这批 Unseal Key 绝对不可以彼此相见,必须交给独立的不同的人进行保管。
当拥有 Root 权限的管理员确信系统面临着迫在眉睫的威胁时,也可以立即重新封印 Vault:
$ vault operator seal
Success! Vault is sealed.
这时 Vault 又重新进入了封印状态,需要重新解封才能正常工作。
重建 Root 令牌
由于 Root 令牌代表的是 Valut 中权限最高的账号,所以 Root 令牌仅应被用于初始化后创建其他管理员账号,而后应被吊销,不在日常操作中使用。但是如果管理不慎,Root 令牌面临泄密风险,又或者 Root 令牌遗失,我们如何更换 Root 令牌?
首先想要重建 Root 令牌,Vault 必须处于解封状态(封印状态下 Vault 无法执行任何操作)。重建 Root 令牌有两种办法,分别是一次性密码(one time password, otp)以及 pgp。本文仅讲述 otp 方法:
$ vault operator generate-root -init
A One-Time-Password has been generated for you and is shown in the OTP field.
You will need this value to decode the resulting root token, so keep it safe.
Nonce         d89404b8-118d-2ce1-4ad4-d09d6398fa8d
Started       true
Progress      0/3
Complete      false
OTP           dhox62ecCxYDfKvy3T1k2e7GqC
OTP Length    26
让我们那构想这样一种可能,一个内鬼主动发起重建 Root 令牌操作,以吊销原 Root 令牌并让自己获取新的 Root 令牌,如何防御这种内部攻击?Vault 重建 Root 令牌的过程被设计成,必须集齐足够的 Unseal Key 才可以执行重建操作,确保内鬼无法独自进行这种攻击,必须获得足够的拥有 Unseal Key 的人的协助(现在明白为什么笔者建议由高管保存 Unseal Key 了吧)。
我们刚才的命令发起了一次重建 Root 令牌的过程,但此时 Root 令牌尚未重建。我们输入第一个 Unseal Key:
$ vault operator generate-root
Operation nonce: d89404b8-118d-2ce1-4ad4-d09d6398fa8d
Unseal Key (will be hidden):
Nonce       d89404b8-118d-2ce1-4ad4-d09d6398fa8d
Started     true
Progress    1/3
Complete    false
命令行中的 "Unseal Key (will be hidden):" 后面就是我们输入的第一个 Unseal Key,没有显示出来,此时进度显示为 "1/3"。
在非交互式界面下,我们无法这样输入 Unseal Key,那么我们需要借助之前执行 -init 命令得到的的 Nounce 值,使用环境变量来传递这个值:
$ echo $UNSEAL_KEY | vault operator generate-root -nonce=d89404b8-118d-2ce1-4ad4-d09d6398fa8d -
Nonce       d89404b8-118d-2ce1-4ad4-d09d6398fa8d
Started     true
Progress    2/3
Complete    false
请董事长亲自输入最后一条 Unseal Key 后:
$ vault operator generate-root
Operation nonce: d89404b8-118d-2ce1-4ad4-d09d6398fa8d
Unseal Key (will be hidden):
Nonce            d89404b8-118d-2ce1-4ad4-d09d6398fa8d
Started          true
Progress         3/3
Complete         true
Encoded Token    F0YHLX5WBiYtMj4XHgFOAFAgWDlhV111KS4
我们成功地重建了 Root 令牌,但是我们并没有直接得到它,而是得到了 Encoded Token。这是用之前生成的 otp 加密后的 Root 令牌,用以防止董事长是内鬼泄密(陛下何故谋反?)。
$ vault operator generate-root -decode=F0YHLX5WBiYtMj4XHgFOAFAgWDlhV111KS4 -otp=dhox62ecCxYDfKvy3T1k2e7GqC
s.hUHdcEnJgSxJ8yctiRS2j2Xm

$ vault login s.hUHdcEnJgSxJ8yctiRS2j2Xm
Success! You are now authenticated. The token information displayed below
is already stored in the token helper. You do NOT need to run "vault login"
again. Future Vault requests will automatically use this token.

Key                  Value
---                  -----
token                s.hUHdcEnJgSxJ8yctiRS2j2Xm
token_accessor       0WzrxaURnBvLSsUUrgth0HKi
token_duration       ∞
token_renewable      false
token_policies       ["root"]
identity_policies    []
policies             ["root"]
当我们给出了正确的 Encoded Token 和 otp 后,我们成功地得到了重建的 Root 令牌,经过验证,该 Token 真实有效。
小结
Vault 在设计上极其重视安全性,使用 Master Key 保护保存的所有数据,又专门设计了 Unseal Key 来保护 Master Key。默认情况下 Vault 采用 Shamir 算法,将 Unseal Key 切分成 M 份,要求至少获取 N 份才能正确解密 Master Key,这就将监督的权力分发给了 M 个不同的人,笔者建议这 M 人要选择公司内比较重要岗位的人。
Vault 服务启动后默认将处于 Sealed 状态,这时由于 Master Key 尚未解密,所以 Vault 无法执行任何操作,必须解封。当 Vault 集群重启后也必须执行解封操作。
为了应对 Root 令牌可能的泄密,以及可能的内鬼针对 Root 令牌的重置攻击,Vault 设计了一套非常健壮的 Root 令牌重建机制,确保了只有在拥有了多数 Unseal Key 的情况下才能成功重建 Root 令牌,并且用一次性密码 otp 保障了拥有 Unseal Key 的人无法知晓新的 Root 令牌,实现了 Vault 管理员与 Unseal Key 拥有者的互相制衡与监督,具有极高的安全性。
本文出于演示目的,所以关闭了 tls 链路加密,但读者们可以很容易地理解,由于我们会往 Vault 发送 Root 令牌、Unseal Key 这样的非常机密的信息,所以生产环境部署时请务必使用 tls 加密链路。