用Vault 与 Consul-Template 管理 Windows 环境变量中的机密
最近参与的一个开源项目中配有大量的验收测试,在提交代码之前需要运行这些验收测试,把测试结果与代码一并提交给社区,而这些验收测试要求在系统环境变量中配置使用的 Azure 的凭据(Credential)信息。这鼓励了团队成员申请一个长生命周期的凭据,并手工硬编码配置在自己开发环境的环境变量中。实际上这并不是一个最佳实践,因为即使在团队成员休息、休假的时候,这些凭据仍然是有效的,仍然存在被有意无意地泄漏的风险。近年来机密信息被错误地推送到公开的 Github 仓库而被恶意利用的案例屡见不鲜。
Azure CLI 提供了另一种身份认证方式,即直接执行:
$ az login
该命令会打开一个 Azure 登录页面,要求用户登录。登录成功后 Azure CLI 会获得一个临时的用户凭据,后续的 CLI 或是 Terraform 操作在默认情况下都会使用该凭据,不需要显式设置各种机密。
但是这种方法存在两个局限:
- 很难控制凭据的有效期,有时我们还在使用,但它过期了;有时我们已经下班回家了,但凭据其实还有效(这似乎并不是什么问题)
- 该认证方式依赖于人类交互,无法应用于自动化环境(例如 CI 流水线中)
有没有办法为自动化环境构建一种同样安全的认证方式,它应该能够:
- 使用短生命周期的凭据,使得凭据仅在我们使用开发环境的时候有效
- 适用于自动化环境,以环境变量或是凭据文件的形式存在
- 设置凭据的过程尽可能简单
在这里我们要搭配 HashiCorp 开发的另一个开源工具 Consul-Template 来构建一种这样的方案。
Consul-Template
Consul-Template 仓库的说明中对该项目的描述如下:
This project provides a convenient way to populate values from Consul into the file system using the consul-template daemon. The daemon consul-template queries a Consul or Vault cluster and updates any number of specified templates on the file system. As an added bonus, it can optionally run arbitrary commands when the update process completes. Please see the examples folder for some scenarios where this functionality might prove useful.
简而言之该项目可以把存储在 Consul 或是 Vault 中的信息“渲染”成一个本机的文件,并且在依赖的信息发生变化时可以重新渲染。这对于想要把一些依赖于配置文件的遗留系统也纳入云原生的架构来说有时会很有用,例如可以使用配置文件来做服务发现等。现在我们先按下不表。
实验环境
本次实验使用的是 Windows 10,我们需要安装好 Vault 和 Consul-Template 以及 Azure CLI。Vault 和 Azure CLI 建议使用 Chocolaty 进行安装,而 Consul-Template 则有些特殊,Chocolaty 中的版本太旧,而目前最新版本(v0.27.x)又有问题(具体的问题后面会叙述),所以推荐阅读 Consul-Template 仓库的说明文档中关于安装的章节,使用 v0.26.0 版本。
另外为了运行本次实验,需要配置一个高权限的 Azure 账号,要获取 client_id、client_secret、tenant_id、subscripton_id 这四个机密,具体步骤我们可以阅读 Terraform AzureRM Provider 的帮助文档,写的非常详细。需要说明的是,这组机密必须是一个长生命周期的机密,但它并不是我们日常使用的,而是配置在 Vault 里,通过该账号去操作我们日常使用的短生命周期凭据的。由于我们使用的这个账号的权限比较高,请妥善保存,确保该机密仅存在于 Vault 当中。
启动和配置 Vault Server
在 Windows 命令行中执行:
>vault server -dev
==> Vault server configuration:

             Api Address: http://127.0.0.1:8200
                     Cgo: disabled
         Cluster Address: https://127.0.0.1:8201
              Go Version: go1.16.7
              Listener 1: tcp (addr: "127.0.0.1:8200", cluster address: "127.0.0.1:8201", max_request_duration: "1m30s", max_request_size: "33554432", tls: "disabled")
               Log Level: info
                   Mlock: supported: false, enabled: false
           Recovery Mode: false
                 Storage: inmem
                 Version: Vault v1.8.4
             Version Sha: 925bc650ad1d997e84fbb832f302a6bfe0105bbb

==> Vault server started! Log data will stream in below:

...
WARNING! dev mode is enabled! In this mode, Vault runs entirely in-memory
and starts unsealed with a single unseal key. The root token is already
authenticated to the CLI, so you can immediately begin using Vault.

You may need to set the following environment variable:

PowerShell:
    $env:VAULT_ADDR="http://127.0.0.1:8200"
cmd.exe:
    set VAULT_ADDR=http://127.0.0.1:8200

The unseal key and root token are displayed below in case you want to
seal/unseal the Vault or re-authenticate.

Unseal Key: UlwuYJgN2VDDcejBRaY8Pqd+Pga4YugV2VXa2wLbXs8=
Root Token: s.nbMzfLlBfAb5S4O2zb3DzeFJ

Development mode should NOT be used in production installations!
然后我们启用 Azure Secret Engine,配置 Vault 使用的 Azure 账号凭据。请在一个新的命令行窗口中输入:
>set VAULT_ADDR=http://127.0.0.1:8200

>vault login s.nbMzfLlBfAb5S4O2zb3DzeFJ
Success! You are now authenticated. The token information displayed below
is already stored in the token helper. You do NOT need to run "vault login"
again. Future Vault requests will automatically use this token.

Key                  Value
---                  -----
token                s.nbMzfLlBfAb5S4O2zb3DzeFJ
token_accessor       g12y5M7RMuXNNSqrGzQCRayZ
token_duration       ∞
token_renewable      false
token_policies       ["root"]
identity_policies    []
policies             ["root"]

>vault secrets enable azure
Success! Enabled the azure secrets engine at: azure/

>vault write azure/config subscription_id=<your_subscription_id> client_id=<your_client_id> client_secret=<your_client_secret> tenant_id=<your_tenant_id>
Success! Data written to: azure/config
然后我们新建一个名为 azure.hcl 的文件,内容如下:
[
    {
        "role_name": "Contributor",
        "scope": "/subscriptions/<your_subscription_id>/resourceGroups/vault-education"
    }
]
这里需要指出的是,我们假设后续创建的短生命周期凭据的作用范围都是在名为 vault-education 的 ResourceGroup 下的。我们需要在 Azure 上创建这个 ResourceGroup。如果想要调整作用范围(例如使得短生命周期凭据作用于整个 Subscription 范围),那么请自行修改文件中的 scope。
随后我们向 Vault 提交该策略:
>vault write azure/roles/edu-app ttl=2m azure_roles=@./azure.hcl
Success! Data written to: azure/roles/edu-app
该策略将创建一个在 vault-education 这个 ResourceGroup 下有效的 Contributor 角色的账号,其有效期为2分钟。
至此 Vault Server 部分我们已经配置完成了。
配置 Azure Active Directory 权限
目前的 Vault Server 使用 Azure Active Directory Graph API 来操作 Azure 上的账号,所以需要配置相应 API 权限。但是由于 Azure 有意淘汰 Azure Active Directory Graph API,督促用户使用新的 Microsoft Graph API,所以 HashiCorp 官方的 Learn 教程中描述的通过 Portal 设置 API 权限的方式已不可行(界面上已经无法配置了),这里我们需要使用 Azure CLI 来进行配置。
首先通过 Azure CLI 登录:
>az login
The default web browser has been opened at https://login.microsoftonline.com/organizations/oauth2/v2.0/authorize. Please continue the login in the web browser. If no web browser is available or if the web browser fails to open, use device code flow with `az login --use-device-code`.
...
然后用以下命令添加权限:
>az ad app permission add --id <your_client_id> --api 00000002-0000-0000-c000-000000000000 --api-permissions 1cda74f2-2616-4834-b122-5cb1b07f8a59=Role
Invoking "az ad app permission grant --id <your_client_id> --api 00000002-0000-0000-c000-000000000000" is needed to make the change effective
>az ad app permission add --id <your_client_id> --api 00000002-0000-0000-c000-000000000000 --api-permissions 78c8a3c8-a07e-4b9e-af1b-b5ccab50a175=Role
Invoking "az ad app permission grant --id <your_client_id> --api 00000002-0000-0000-c000-000000000000" is needed to make the change effective
>az ad app permission grant --id <your_client_id> --api 00000002-0000-0000-c000-000000000000
...
这里面的 00000002-0000-0000-c000-000000000000 代表 Azure Active Directory Graph API,而 1cda74f2-2616-4834-b122-5cb1b07f8a59 和 78c8a3c8-a07e-4b9e-af1b-b5ccab50a175 代表着 Application.ReadWrite.All 和 Directory.ReadWrite.All 这两个我们需要的权限(可以在这篇博客中查到)。
配置好权限,让我们测试一下 Vault 是否可以正确地创建 Azure 账号:
>vault read azure/creds/edu-app
Key                Value
---                -----
lease_id           azure/creds/edu-app/HqusX5LF7s1D87DiQpRnR1sv
lease_duration     2m
lease_renewable    true
client_id          055edb07-7b86-4569-b221-c07a43fa092e
client_secret      5N9g4hAvw8pX4hDJ5c2zPpcw0Civcwnht9HT
我们也可以在 Azure Active Directory 的 App registrations 中确认:
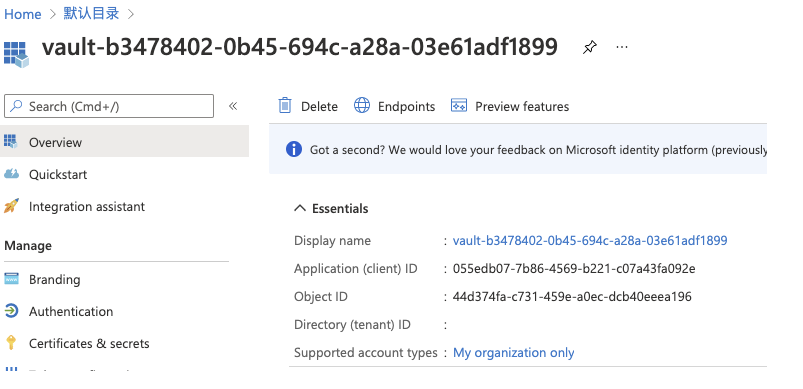
需要特别指出的是,我敢在这里直接输出结果中的 client_id 和 client_secret,是因为它的有效期只有 2 分钟,并且我确认了它已经被 Vault 正确吊销了。请大家一定要确认不要泄漏自己的长生命周期凭据。
配置 Consul-Template
先确认一下当前版本:
>consul-template -version
 v0.26.0 (3b7f233a)
请一定要注意不要使用最新的 v.0.27.0 或以上的版本。
创建一个 ct_config.hcl 文件,内容如下:
vault {
  address = "http://127.0.0.1:8200"
  token = "s.nbMzfLlBfAb5S4O2zb3DzeFJ"
  renew_token = false
}
配置文件中使用了 Vault 的 Root Token,这是因为我们在做实验。生产环境下这里的 Token 最好是使用 Token 文件,内容是每个用户自己登录自己 Vault 账号后得到的 Token。renew_token = false 也是因为我们使用的 Root Token 是不可续期的,所以显式设置为 false,生产环境使用时请根据自身情况进行配置。
再创建一个名为 config_env.ps1.tplt 的文件,内容如下:
[Environment]::SetEnvironmentVariable("ARM_SUBSCRIPTION_ID", "<your_subscription_id>", 'Machine')
[Environment]::SetEnvironmentVariable("ARM_TENANT_ID", "<your_tenant_id>", 'Machine')

{{ with secret "azure/creds/edu-app" }}
[Environment]::SetEnvironmentVariable("ARM_CLIENT_ID", "{{ .Data.client_id }}", 'Machine')
[Environment]::SetEnvironmentVariable("ARM_CLIENT_SECRET", "{{ .Data.client_secret }}", 'Machine')
{{ end }}

while ($true) {
    Start-Sleep -Seconds 1
}
本质上这就是一个 PowerShell 脚本,调用 [Environment]::SetEnvironmentVariable 方法设置四个环境变量:ARM_SUBSCRIPTION_ID、ARM_TENANT_ID、ARM_CLIENT_ID 和 ARM_CLIENT_SECRET。唯一和普通 PowerShell 脚本不同的地方在于,设置 ARM_CLIENT_ID 和 ARM_CLIENT_SECRET 的部分使用了 Golang Template 语法,这就是 Consul-Template 支持的模板语法。这段模板的意思是读取 Vault 的 azure/creds/edu-app 这个路径下的机密(等同于刚才测试时通过 Valut CLI 执行的 read),然后把结果中的 client_id 和 client_secret 填充进脚本。
脚本的最后是一个永远运行的循环,只有接收到退出信号时脚本才会终止执行,这是 Consul-Template 要求的,我们将会以 Exec 模式运行 Consul-Template ,在它渲染该脚本文件后启动一个 PowerShell 进程来执行它,该进程如果结束运行会导致 Consul-Template 也结束运行,那这样的话就没有办法为我们自动执行续期了,所以我们要确保它永远执行(直到我们关闭它为止)。
让我们启动 Consul-Template:
>consul-template -template "./config_env.ps1.tplt:./config_env.ps1" -config "./ct_config.hcl" -exec "powershell.exe -noexit -file ./config_env.ps1"
Windows PowerShell
版权所有 (C) Microsoft Corporation。保留所有权利。

尝试新的跨平台 PowerShell https://aka.ms/pscore6
这段命令意思是,以 ct_config.hcl 文件为 Consul-Template 使用的配置,渲染 config_env.ps1.tplt 这个模板文件,把渲染的结果存放在 config_env.ps1 这个文件里,然后执行 powershell.exe -noexit -file ./config_env.ps1 命令,也就是执行我们刚刚渲染出来的 PowerShell 脚本。Consul-Template 从 v.0.27.0 开始不再支持 Windows 平台上的多行命令,所以如果你使用的是 v0.27.0 或更新的版本,你可能会遇到一个错误。我个人认为该问题只是暂时的,将来应该是会被解决的。
等我们成功看到 PowerShell 的输出后,我们可以查看一下 config_env.ps1 的内容:
[Environment]::SetEnvironmentVariable("ARM_SUBSCRIPTION_ID", "<your_subscription_id>", 'Machine')
[Environment]::SetEnvironmentVariable("ARM_TENANT_ID", "<your_tenant_id>", 'Machine')


[Environment]::SetEnvironmentVariable("ARM_CLIENT_ID", "58484968-1d18-4a6c-8335-28c98e491dc3", 'Machine')
[Environment]::SetEnvironmentVariable("ARM_CLIENT_SECRET", "sSpY2gst2o8RO6L0VRfobBNHjWvGI8g4vxQz", 'Machine')


while ($true) {
    Start-Sleep -Seconds 1
}
同样的我们也可以通过 Portal 确认该账号的存在。让我们打开设置系统环境变量窗口来观察一下环境变量:
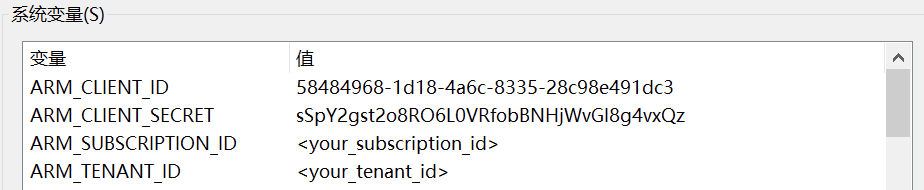
与刚才用 Vault CLI 创建的只有2分钟生命的账号不同,你会发现 Consul-Template 创建的账号在 2 分钟以后仍然活蹦乱跳的,这是因为 Consul-Template 会检查它创建出来的租约的有效期,会在有效期只剩一半时向 Vault 提交续期申请,也就是说,只要这个 Consul-Template 和它启动的 PowerShell 窗体持续运行,那么环境变量里配置的凭据就持续有效。如果我们停止进程、关闭主机或进入睡眠状态、或是简单地合上笔记本盖子,由于 Consul-Template 无法再执行续期操作,所以该账号就只剩 2 分钟的生命了(前提是 Vault Server 运行在另外独立的主机上,因为吊销必须由 Vault Server 来执行,所以关机等操作在本次实验中是不适用的)。
我们可以尝试用 Ctrl + C 关闭进程:
>consul-template -template "./config_env.ps1.tplt:./config_env.ps1" -config "./ct_config.hcl" -exec "powershell.exe -noexit -file ./config_env.ps1"
Windows PowerShell
版权所有 (C) Microsoft Corporation。保留所有权利。

尝试新的跨平台 PowerShell https://aka.ms/pscore6

Cleaning up...
过大约 2 分钟后,我们可以在 Vault Server 的输出中看到这样的信息:
2021-11-07T15:49:18.327+0800 [INFO] expiration: revoked lease: lease_id=azure/creds/edu-app/5Gx0PjUjtORAW16stpEhBCta
这就代表 Vault 吊销了这个过期的租约,这时我们在 Azure Active Directory 中会发现账号被正确删除了。
用这种方法我们就可以达到最初的三个目的:
- 使用短生命周期的凭据,使得凭据仅在我们使用开发环境的时候有效
- 适用于自动化环境,以环境变量或是凭据文件的形式存在
- 设置凭据的过程尽可能简单
另外如果是进入睡眠状态或是合上笔记本盖子后,在租约被吊销、账号被删除以后,如果我们重新打开系统,Consul-Template 恢复运行时会发现自己创建的租约已经被吊销了,它会重新向 Vault 申请一个租约,重新渲染 PowerShell 文件,然后重新设置环境变量,我们往往会意识不到环境变量其实已经变了,这时有可能还要执行 refreshenv 命令重新加载环境变量。